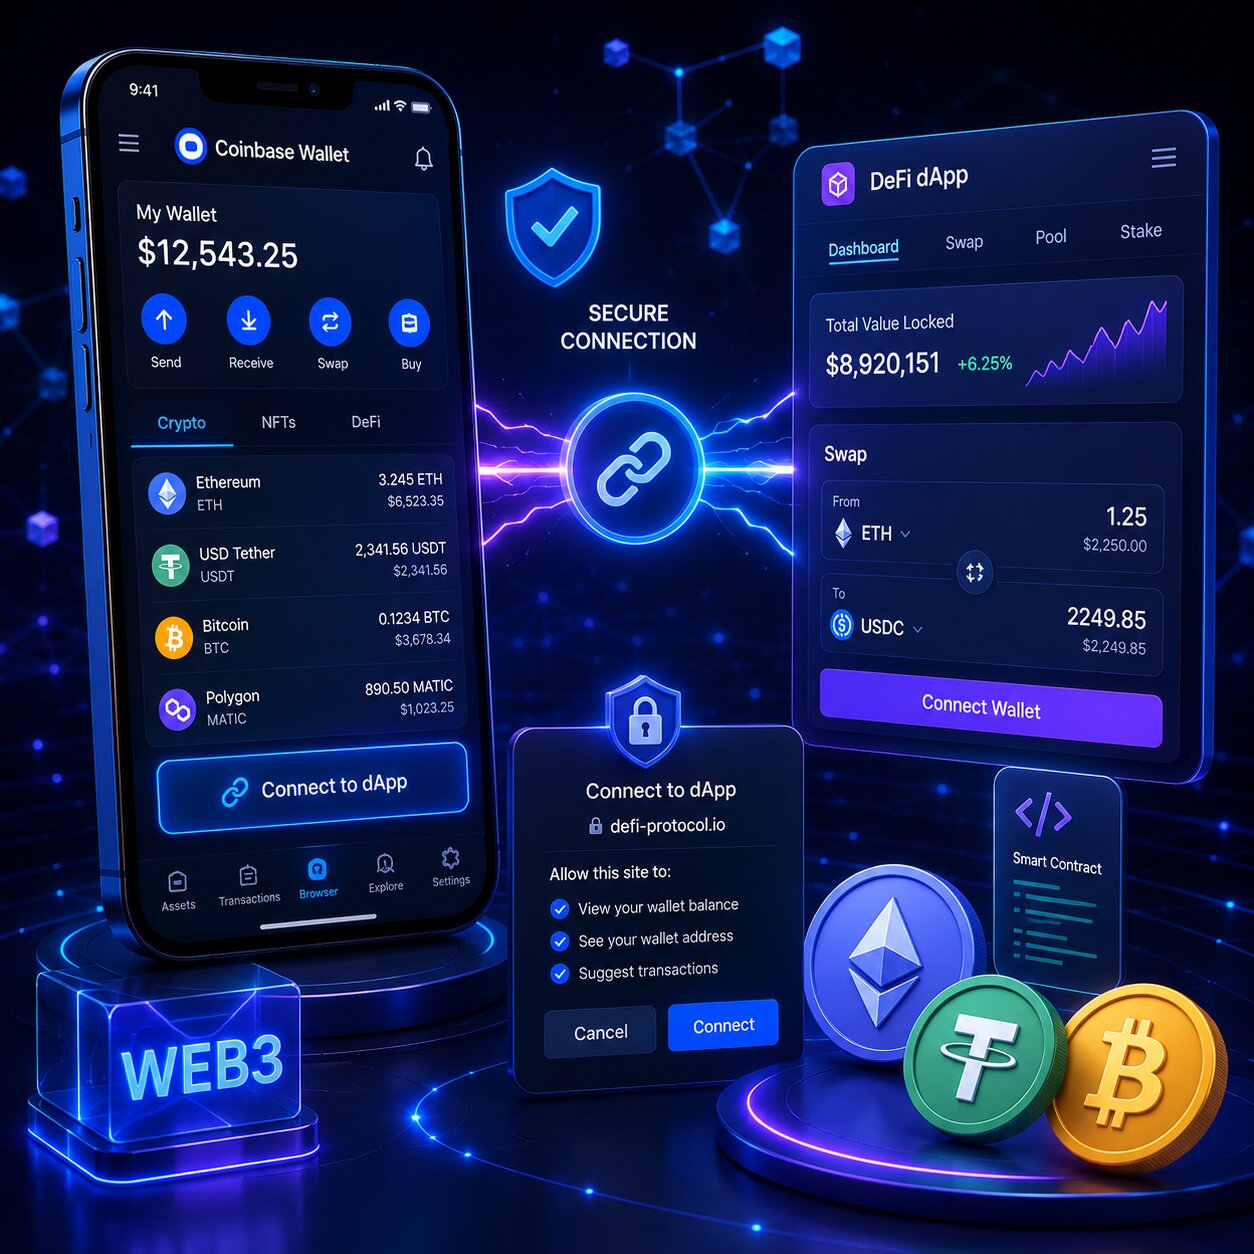
Coinbase Wallet connects to dApps via three methods – Browser Extension, QR Code (Wallet SDK), and WalletConnect. Connection shares Public Address only. Private keys never leave the device. Every on-chain transaction requires explicit user approval.
Entity
Role
Layer
Coinbase Wallet
Wallet provider
Core
WalletConnect
Cross-platform connection protocol
Connection
Browser Extension
Desktop browser injection
Connection
Wallet SDK
Encrypted mobile-to-desktop bridge
Connection
Token Approval
Smart Contract spending permission
Security
Smart Contract
On-chain execution engine
Security
Phishing
Fake dApp attack vector
Risk
Coinbase Wallet shares only the public wallet address during a dApp connection, while private keys remain stored securely on the user’s device and are never transmitted through WalletConnect or any other connection method.
What is a Coinbase Wallet dApp connection and what data does it share?
A dApp connection grants read access to the Public Address and token balances. It does not grant fund transfer rights – every transaction requires separate user approval.
A dApp receives only the public wallet address for read access during connection. The connection alone does not grant access to funds or private keys.
Smart contracts require a separate user signature for every transaction. Transactions cannot execute automatically without wallet approval.
A wallet connection establishes a cryptographic session between the wallet and the dApp interface. The session enables secure communication and transaction requests.
Disconnecting the wallet ends the active session but does not cancel existing token approvals. Token approvals remain active on-chain until manually revoked.
What can a dApp read and what can it not access after Coinbase Wallet connection?
A dApp cannot access funds after connection. It only reads Public Address and balances. Fund transfers require explicit user approval or prior Token Approval via Smart Contracts.
Access Type
dApp Can
dApp Cannot
Wallet data
Read Public Address
Access private keys or seed phrase
Balances
Read token balances per chain
Transfer tokens without approval
Transactions
Request transaction signature
Execute transactions without confirmation
Token Approvals
Request Smart Contract spending limit
Exceed approved limit
A public wallet address is not sensitive information. Anyone can view wallet balances and transaction history through blockchain explorers.
Token approvals grant smart contracts permission to spend a specific amount of a cryptocurrency token. Users approve these permissions during DeFi interactions and token swaps.
Unlimited token approvals grant smart contracts access to the entire token balance. This permission level creates significant security risk if the smart contract becomes malicious or compromised.
What is the difference between a dApp connection and a Token Approval?
Connection is read-only and session-based. Token Approval is an on-chain permission that survives disconnection. Connection carries low risk. Unlimited Token Approval carries high risk.
Action
Scope
Reversible
Risk
dApp Connection
Public Address read access
Disconnect anytime
Low
Token Approval
Smart Contract spending rights
Revoke via Revoke.cash
High if unlimited
Transaction Signature
One specific on-chain action
Irreversible
High
How do the three Coinbase Wallet connection methods differ?
Browser Extension is fastest for desktop. QR Code enables mobile-level security on desktop. WalletConnect supports the widest dApp range across all platforms.
Method
Speed
Security
Device
Protocol
Browser Extension
High
Medium – desktop hot wallet
Desktop only
window.ethereum injection
QR Code (Wallet SDK)
Medium
High – biometric on mobile
Mobile + Desktop
WalletLink / Wallet SDK
WalletConnect
Medium
High – encrypted session
Cross-platform
WalletConnect v2
The Coinbase Wallet Browser Extension injects window.ethereum into desktop browsers for direct dApp connectivity. This integration allows decentralized applications to communicate with the wallet automatically.
Wallet SDK creates an encrypted bridge between the Coinbase Wallet mobile app and desktop browsers. The secure connection routes authentication and transaction approval requests between devices.
WalletConnect v2 supports multi-chain sessions through a single connection. Users can interact with multiple blockchain networks simultaneously without reconnecting the wallet for each chain.
Which blockchains does Coinbase Wallet support for dApp connections?
Coinbase Wallet supports all EVM-compatible chains and Solana for dApp connections. The Browser Extension and Wallet SDK both cover EVM chains. WalletConnect v2 adds multi-chain session support.
Blockchain Type
Browser Extension
QR Code (Wallet SDK)
WalletConnect
Ethereum + EVM chains
Yes
Yes
Yes
Solana
Yes
Yes
Yes
Non-EVM (Bitcoin)
No
No
Limited
Layer 2 (Base, Arbitrum, Optimism)
Yes
Yes
Yes
How do you connect Coinbase Wallet to a dApp using the Browser Extension — step by step?
The Browser Extension connects by injecting window.ethereum into the desktop browser. No QR code required – connection initiates from the dApp’s Connect Wallet button.
Steps:
install the Coinbase Wallet Browser Extension from the official Chrome Web Store, Brave Store, Firefox Add-ons, or Microsoft Edge Add-ons marketplace.
Open a supported decentralized application website such as Uniswap, Aave, or OpenSea.
Click “Connect Wallet” on the dApp homepage or navigation menu.
Select “Coinbase Wallet” from the list of available wallet connection options.
Review the connection approval popup displayed by Coinbase Wallet. Verify the dApp name and website URL carefully before continuing.
Click “Approve” to establish the wallet connection. The dApp will receive the wallet’s public address after approval.
Note: Always verify the dApp URL before clicking Connect Wallet. Phishing sites mimic legitimate dApps – one character difference in the URL routes to a malicious Token Approval.
How does Auto-connect work for returning Coinbase Wallet users on dApps?
Auto-connect remembers approved dApps and reconnects silently on return visits – eliminating repeated connection approvals for trusted platforms.
Auto-connect State
Behavior on Return Visit
Enabled
Wallet reconnects silently – no approval needed
Disabled
Manual Connect Wallet approval required each visit
Auto-connect eliminates repeated wallet connection approvals for trusted dApps. Approved applications reconnect automatically during future visits.
The Connected dApps list stores all active Auto-connect sessions inside the wallet settings. Users can review and manage connected applications from one location.
Disabling Auto-connect does not revoke existing token approvals on-chain. Token approvals must be revoked separately to remove smart contract spending permissions.
How do you connect Coinbase Wallet to a desktop dApp using QR Code – step by step?
QR Code connection bridges the Coinbase Wallet mobile app to a desktop browser via Wallet SDK. It enables mobile biometric security on any desktop without the Browser Extension.
Steps:
Open the decentralized application on a desktop browser and click “Connect Wallet.”
Select “Coinbase Wallet” from the available wallet connection options.
Wait for the QR code to appear on the desktop screen.
Open the Coinbase Wallet mobile app on your phone.
Tap the three-dot menu icon inside the app and select “Scan.”
Scan the QR code displayed on the desktop browser.
Review the connection request shown in Coinbase Wallet on the mobile device.
Approve the connection request to establish the encrypted session.
After approval, the desktop dApp receives the wallet’s public address and the connection becomes active.
Note: When using a mobile browser, a QR code is not required. Tap “Connect Wallet,” select Coinbase Wallet, and the mobile app opens directly for connection approval.
How does Wallet SDK create an encrypted QR Code session for Coinbase Wallet?
Definition: Wallet SDK (formerly WalletLink) is Coinbase’s open-source protocol that creates an end-to-end encrypted bridge between the mobile app and any desktop browser.
Function:
Wallet SDK generates a unique QR code that contains a single-use session key. The session key securely initializes the wallet connection process between devices.
Scanning the QR code establishes an encrypted communication channel between the desktop dApp and the mobile wallet app. The connection protects session data during transmission.
The encrypted session routes transaction approval requests from the desktop interface to the mobile device. Users review and authorize actions securely through the wallet app.
Biometric authentication approves each transaction on the mobile device. Face ID or fingerprint verification adds an additional security layer before transaction confirmation.
Risk: QR code interception is not possible — session key is single-use and expires after scanning.
Next: WalletConnect extends connection to 6,000+ dApps across all platforms.
How do you connect Coinbase Wallet to a dApp via WalletConnect – step by step?
WalletConnect connects Coinbase Wallet to 6,000+ dApps across 150+ blockchain networks via QR code or deep link on both mobile and desktop.
Steps – Coinbase Wallet initiates:
Open the Coinbase Wallet mobile app on your device.
Tap “Settings” and scroll down to the “WalletConnect” section.
Select “Connect to a dApp” to open the WalletConnect QR code scanner.
Open the decentralized application on another device and select the “WalletConnect” connection option.
Scan the displayed WalletConnect QR code using Coinbase Wallet.
Confirm the connection request on both the mobile app and the dApp interface to establish the WalletConnect session.
Steps – dApp initiates:
Open the decentralized application and click “Connect Wallet.”
Select “WalletConnect” from the list of supported wallet connection methods.
Wait for the dApp to display the WalletConnect QR code on the screen.
Open Coinbase Wallet and tap the Scan icon.
Scan the WalletConnect QR code displayed by the dApp.
Review the connection request details and approve the connection inside Coinbase Wallet.
What is a WalletConnect v2 multi-chain session in Coinbase Wallet?
Definition: WalletConnect v2 multi-chain session connects Coinbase Wallet to a dApp across multiple blockchain networks simultaneously via a single connection approval.
Function:
WalletConnect v2 establishes a single session across multiple blockchain networks such as Ethereum, Base, and Polygon. Users can interact with supported chains without reconnecting the wallet repeatedly.
Multi-chain sessions eliminate repeated connection approvals during network switching. The wallet remains connected across all approved chains within the same session.
The connected dApp can read wallet addresses across all approved blockchains from one WalletConnect session. The session simplifies multi-chain DeFi interactions and cross-network application access.
WalletConnect Version
Multi-chain
dApps Supported
Session Persistence
v1 (deprecated)
Single chain
4,000+
Per session
v2 (current)
Multi-chain
6,000+
Persistent until revoked
Is it safe to connect Coinbase Wallet to a dApp – and what are the Token Approval risks?
Connecting to a legitimate dApp is safe. Risk arises from Phishing sites requesting unlimited Token Approvals that grant malicious Smart Contracts unlimited wallet access.
A legitimate dApp requests only the public wallet address during the initial connection process. Connecting a wallet alone does not grant access to funds or private keys.
A phishing dApp often requests unlimited token approvals immediately after wallet connection. Malicious smart contracts use unlimited approvals to gain unrestricted spending access.
Coinbase identified approximately 20,000 approval-phishing victims and froze $12 million in stolen assets during 2025. Approval phishing remains one of the most common DeFi wallet attack methods.
How does a Phishing approval scam steal funds after Coinbase Wallet connection?
Definition: Approval phishing tricks users into signing a Token Approval that grants a malicious Smart Contract unlimited access to their token balance.
Attack flow:
Step
Action
Risk
1
User visits Phishing site mimicking legitimate dApp
URL typosquatting
2
User connects Coinbase Wallet — shares Public Address
Low risk at this step
3
Phishing dApp requests unlimited Token Approval
Critical risk point
4
User approves — Smart Contract gains unlimited token access
Phishing dApps mimic legitimate application URLs by changing a single character or spelling variation. Fake domains often appear visually identical to trusted DeFi platforms.
Unlimited token approvals remain active on-chain even after disconnecting the wallet from the dApp. Disconnecting alone does not remove smart contract spending permissions.
Coinbase never contacts users to request wallet connections or token approvals. Unsolicited connection requests, approval prompts, or support messages usually indicate phishing attempts or scams.
What happens if you sign a malicious transaction in Coinbase Wallet?
A malicious transaction signature is irreversible. Once signed and broadcast, the blockchain executes the transaction – Coinbase Wallet cannot cancel, reverse, or recover funds.
Transaction Type
Reversible
Recovery Option
Token transfer (legitimate)
No
None
Token Approval (malicious)
Revoke before exploitation
Revoke.cash before attacker drains
Signed malicious tx
No
None – blockchain is final
How do you verify a dApp is safe before connecting Coinbase Wallet?
Verification Step
Tool
Checks
URL verification
Browser address bar
Exact domain — no character substitution
Smart Contract audit
CertiK.com / Halborn
Protocol security audit status
Community reputation
DappRadar / DeFi Llama
Active users and TVL history
Token Approval amount
Coinbase Wallet popup
Unlimited vs specific amount
Scam reports
Chainabuse.com
Community-reported exploits
An unlimited token approval request in a wallet popup is a security warning sign. Users should reject approvals that grant unrestricted token spending access to smart contracts.
If the approval amount is set to unlimited, reject the request and configure a specific spending amount instead. Limited approvals reduce exposure if the smart contract becomes compromised.
Always verify the dApp URL character by character before connecting the wallet. Phishing websites often imitate legitimate domains using visually similar characters or spelling variations.
How do you disconnect Coinbase Wallet from a dApp and revoke Token Approvals?
Disconnecting ends the active dApp session. Revoking Token Approvals cancels Smart Contract spending rights. Both steps are required for complete permission removal.
Disconnecting a dApp ends the active wallet session and disables Auto-connect for that specific application. The dApp immediately loses access to the wallet connection.
Revoking token approvals cancels smart contract spending permissions on-chain. The approved contract can no longer access or transfer the authorized tokens.
Using both disconnection and token approval revocation fully removes dApp access to Coinbase Wallet. This process ends session access and removes blockchain spending permissions simultaneously.
How do you revoke Token Approvals granted to dApps from Coinbase Wallet?
Visit Revoke.cash, connect Coinbase Wallet, view all active Token Approvals across 100+ EVM chains, and revoke each unwanted approval. Each revocation costs one Gas Fee transaction.
Steps:
Open revoke.cash or etherscan.io/tokenapprovalcheck in a secure browser.
Click “Connect Wallet” on the website homepage.
Select Coinbase Wallet from the list of supported wallet connection options.
Approve the wallet connection request inside Coinbase Wallet to allow the site to read active token approvals.
Review all active token approvals displayed for each connected blockchain network.
Identify unlimited approvals or approvals connected to unknown or suspicious smart contracts.
Click “Revoke” next to the approval you want to remove.
Confirm the revocation transaction inside Coinbase Wallet.
Pay the required gas fee to process the revocation transaction on the blockchain.
Revocation Tool
Chains
Cost
Recommended
Revoke.cash
100+ EVM
Gas Fee per tx
✅ Best for multi-chain
Etherscan Token Approval
Ethereum only
Gas Fee per tx
For ETH-only users
Monthly token approval revocation reviews are recommended for active DeFi users. Regular reviews reduce long-term exposure to malicious or compromised smart contracts.
Each token approval revocation requires a gas fee on the relevant blockchain. The blockchain processes revocation actions as on-chain transactions.
Revoke.cash supports bulk token approval revocation across more than 100 EVM-compatible blockchains. Users can manage and remove multiple smart contract permissions from a single interface.
How do you view and manage all connected dApps in Coinbase Wallet?
Mobile: Settings → Connected dApps → tap dApp → Disconnect
Browser Extension:
Open the wallet settings and navigate to “Connected Sites.”
Locate the connected dApp in the active sessions list and click the “X” icon next to it to disconnect the session.
Review the connected dApps list to see all active wallet connections and their current Auto-connect status.
Disconnecting a dApp immediately removes its access to the wallet’s public address and session permissions.
Use the “Auto-connect” toggle to control whether the dApp reconnects automatically during future visits.
Why is Coinbase Wallet not connecting to a dApp – troubleshooting guide?
Connection failures trace to five primary causes — each maps to a specific fix.
What causes Coinbase Wallet to fail connecting to a dApp and how do you fix it?
Cause
Symptom
Fix
Outdated Browser Extension
Popup does not appear
Update Coinbase Wallet extension
Wrong network selected
Connected but transactions fail
Switch to dApp’s required chain in wallet
Expired WalletConnect QR
QR scan rejected
Regenerate QR code — sessions expire in ~5 min
Multiple wallets conflicting
MetaMask overrides Coinbase Wallet
Disable other wallet extensions temporarily
Browser cache conflict
Previous session error
Clear browser cache and cookies — reconnect
Conditional logic:
If the connection popup does not appear, update the browser extension first. Outdated wallet extensions are the most common cause of connection failures.
If the wallet connects but transactions fail, the selected blockchain network is likely incorrect. Switch to the correct chain in the wallet network settings before retrying the transaction.
If the QR code scan is rejected, regenerate the WalletConnect QR code. WalletConnect sessions expire automatically after a limited time.
If MetaMask overrides the connection request, disable the MetaMask extension temporarily and reconnect using only Coinbase Wallet. Multiple active wallet extensions can interfere with dApp connection routing.
FAQ
How do I connect Coinbase Wallet to a dApp?
Connect by visiting the dApp, clicking Connect Wallet, and selecting Coinbase Wallet. On desktop, use the Browser Extension for direct connection or scan the QR code with the mobile app. On mobile, tap Connect Wallet and select Coinbase. Connection shares Public Address only — no fund access granted.
How do I connect Coinbase Wallet to WalletConnect?
Open Coinbase Wallet, tap Settings, scroll to WalletConnect, tap Connect to a dApp, and scan the dApp’s QR code. Alternatively, select WalletConnect on the dApp – a QR code appears – scan it with the Coinbase Wallet QR scanner and confirm on both devices.
How do I connect Coinbase Wallet on desktop?
Install the Coinbase Wallet Browser Extension from the official store, visit the dApp, and click Connect Wallet. Alternatively, select Coinbase Wallet on the dApp to display a QR code — scan it with the mobile app to establish an encrypted Wallet SDK session. No extension required for QR method.
Can a dApp access my funds after connecting to Coinbase Wallet?
No. Connection shares Public Address and token balances – read access only. A dApp cannot transfer funds without explicit user approval per transaction. Token Approvals via Smart Contracts can grant spending rights, but only up to the approved amount and only with user signature.
How do I disconnect Coinbase Wallet from a dApp?
On mobile: Settings → Connected dApps → select dApp → Disconnect. On Browser Extension: Settings → Connected Sites → click X next to the dApp. Disconnecting ends the active session but does not revoke Token Approvals — revoke them separately via Revoke.cash.
How do I revoke token approvals on Coinbase Wallet?
Visit revoke.cash, connect Coinbase Wallet, view all active Token Approvals across 100+ EVM chains, and click Revoke next to each unwanted approval. Each revocation costs one Gas Fee. Monthly review is recommended for DeFi users to prevent unlimited approval exploits.
Why is my Coinbase Wallet not connecting to a dApp?
Most failures are caused by an outdated Browser Extension, wrong network selection, or an expired WalletConnect QR code. Update the extension, switch to the dApp’s required network in wallet settings, or regenerate the QR code. Disable conflicting wallet extensions if multiple wallets are installed.
Is it safe to connect Coinbase Wallet to dApps?
Connecting to legitimate dApps is safe – only Public Address is shared. Risk comes from Phishing sites requesting unlimited Token Approvals via malicious Smart Contracts. Always verify the dApp URL, reject unlimited Token Approvals, and revoke suspicious approvals monthly via Revoke.cash.